
ESXi 8.0 Installation on work station 16 pro (16.2.4 build-20089737)
- khushnood khan

- Oct 20, 2022
- 2 min read
Updated: Oct 28, 2022
In this blog we will install esxi 8.0 in a workstation 16 pro.
work station version : 16.2.4 build-20089737
esxi version : 8.0 IA(20513097)
Preparing for Installing ESXi
Download the installer for ESXi. You can obtain the software either from an OEM or from the VMware download portal at https://customerconnect.vmware.com/
Prerequisites
Create a VMware Customer Connect account at https://customerconnect.vmware.com/
Procedure
1 Log in to VMware Customer Connect.
2 Navigate to Products and Accounts > All Products.
3 Find VMware vSphere and click Download Product.
4 Select a VMware vSphere version from the Select Version drop-down menu.
5 Select a version of VMware vSphere Hypervisor (ESXi) and click GO TO DOWNLOADS.
6 Download an ESXi ISO image.
7 Confirm the SHA256 checksum.
Note vSphere 8.0 removes insecure default ciphers such as SHA1 and MD5 and replaces them with secure ciphers such as SHA256. For an evaluation copy of ESXi, go to https://www.vmware.com/try-vmware.html. For more information on ESXi downloads, see VMware knowledge base article https:// kb.vmware.com/s/article/2107518. For product patches to ESXi, see VMware knowledge base article 1021623 or go to https:// my.vmware.com/group/vmware/patch.
I have already downloaded the below iso image.

1) Click on file and click on new virtual machine.

2) Choose custom option and click next.

3) Choose workstation 16.2.x and click on next.

4) Choose the option I will install the os later and click next.

5)Choose the guest os as vmware esx and version as vmware esxi 7 and later.

6)Choose the vm name and location.

7) I have selected 2 processor with 3 cores. click on next.

8) I have chosen the memory as 10 GB here.

9)Choose network type as host only. click next

10) Choose paravirtualized scsi as scsi controller and click next.

11)Choose disktype as SCSI and click next.

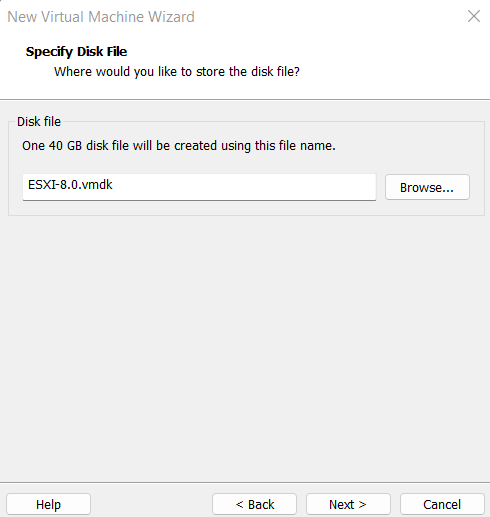
12) Choose create a new disk and click next.

13)Give the size for esxi boot disk. i have selected 40 gb here. Click next.

14)Choose the disk location as default (same as vm) and click next
15) once all are verified click on finish.

16) Right click on the vm and select settings.

17) Choose the cd/dvd for the downloded hypervisor iso as shown below and clcik ok.

18) clcik on the power on option as shown below.

19)loading of esxi immage would start.


20) press enter.

21) Press F11

22) Choose the boot disk and the default keyboard.


23) type the password and press enter.

24) Press f11 to start the installation.

25) Installation would shart.

26) press enter to reboot.

27) once installation is done we will get a window like below.

28) Login to the dcui console by pressing f2.

29) Go to configure management network and press enter.

30)we can see there are quite a few optiones here to configure here.
we can select the network adapter for management network here and click next.


31)we can put the vlan in the vlan option .
i am keeping it blank.

32) under ipv4 configuration we would choose the static option and type in the ip.

33)we would dissable the ipv6 option .

34)configure the DNS as shown below.

35)configure the suffix as shown below.

36) press esc and press y option .

37) host will start reboot .

38)Once the host comes up put the url as shown below use ip or dns is dns is resolved.

39) Proceed with unsafe option and we will get the new esxi logo.

40 Login to the esxi host with root credentials which you choose.


Comments